Incorporating resistance bands into your training regimen will help you get stronger and keep your workouts interesting, regardless of whether you are just starting out in the world of exercise or are a seasoned veteran. You may get a good exercise for your entire body by using resistance bands, and you don’t even have to leave the house or spend a lot of money. In this article is going to examine about 5 types of resistance band workout at home with explained by industry’s best personal trainers.
There is a wide variety available in terms of size, intensity, and length of resistance bands. They are available in a variety of shapes, the most popular of which being tubing, flat bands, and tiny bands (also known as loops). The amount of resistance that a band provides is directly proportional to how stretchy it is.
In general, bands that are darker in color, such as black or blue, are tighter and provide more resistance than lighter-colored bands. On the other hand, since yellow and green are elastic, they are a better choice for novices than the other colors. Closed loops, handles, and flat therapeutic bands that do not loop are the three different types of bands that may be purchased.
We sent out a call to five of the industry’s best personal trainers and asked them to share their go-to resistance band workouts for the arms, legs, glutes, and core. You may perform each exercise on its own for a shorter, more targeted workout, or you can combine them for an effective at-home full-body regimen.

Workouts With Resistance Bands Provide A Number Of Advantages.
Training with resistance bands is an excellent place to begin if you would like to improve your strength, add diversity to your exercises, and move closer toward reaching your fitness goals in the real world.
People of a wide range of ages and degrees of physical preparedness can use resistance bands without risk. In point of fact, one study indicated that older persons who participated in resistance workouts with resistance bands saw improvements in their balance, gait function, and flexibility.
In addition, one evaluation of study found that employing this fitness tool for resistance can achieve equal strength improvements compared to conventional resistance training.
Consider the following extra advantages of using resistance bands in your workout regimen if you are still on the fence about including them into your program.
- A wide range of resistance levels, widths, and lengths are available in resistance bands.
- They may be folded up, made portable, and are simple to put away.
- They are among the least expensive types of workout equipment that are available.
- You may perform workouts similar to those you would do at a gym at home if you have resistance bands.
- During the exercise’s concentric and eccentric phases, you will experience resistance in both the forward and backward directions of your movement (in other words, when both contracting and lengthening the muscle).
- The resistance may be adjusted to suit a variety of motion ranges and is hence adaptable.
- When using a resistance band, you are able to move in a variety of planes and pull in a wide variety of directions.
- Your muscles will be under strain for a longer period of time if you use resistance bands.
- There are many different types of bands, such as mini bands, loop bands, tube bands with handles, flat therapy bands, and figure 8 bands. Mini bands are the smallest of the band types.
- You’re interested in resistance band training but aren’t sure how to get started, are we right? Take a look at these five quick workouts that were developed by some of the best certified personal trainers.
The Resistance Band Back Workout Performed By Ridge Davis.
Personal trainer Ridge Davis, who is certified by the National Council on Strength and Fitness and hails from West Hollywood, California, is in great demand among high-profile clientele and the most powerful executives in the entertainment industry.
This PUMA-sponsored athlete has more than a decade of experience in the fitness industry and has accumulated 20,000 hours of personal training hours. As a result, he is an expert at devising exercise routines that are appropriate for all levels of fitness.
His method of teaching customers results in transformations that are more permanent by educating them about fitness, nutrition, and overall wellbeing. In addition to that, he has worked with companies such as Fabletics and GLO, as well as Vital Proteins, Puma, Amazon, and Hollywood Life, to host their own virtual workouts.
Superman Pull.
Mini bands are the type of band.
When you execute the Superman pull with a small band, you add resistance to the exercise, which increases the strain placed on the muscles in your lower back, glutes, and core.
- You should wrap the little band around both of your wrists.
- Lay on your stomach with your arms out in front of you and your legs stretched out behind you in a straight line.
- Reach your arms and legs off the floor while maintaining your neck neutral and your gaze on the ground. While doing so, maintain a neutral neck position. Hold your breath for a second before bringing your elbows in close to your sides to form the letter W with your arms.
- To finish one repetition, bring your arms back to the starting position in front of you.
- Perform two sets of 10–15 repetitions.
Bend Over Row With Single Arm Workout.
Mini bands are the type of band.
Your biceps, your back shoulder muscles, and your lats will all benefit from the bent-over single-arm row. This unilateral exercise is a terrific complement to a regimen that targets the back or that targets the entire body.
- Wrap the band around your foot, then on the same side, grasp the opposite end of the band in your palm.
- You should hinge at the hip and maintain a straight position in your lower back. Your palm ought to be pointing toward your torso.
- Engage your core and bring the band straight up to the side of your chest. Make sure that your upper arm is held in a position that is near to your side.
- At the peak of the action, contract your lower abdominal and back muscles (lats). Repeat after lowering yourself carefully back to the starting position.
- Perform two to three sets of ten to fifteen repetitions on each side.
Lat Pulldown Using A Single Arm.
Mini bands are the type of band.
One of the most common and effective back exercises is the lat pulldown, which can be performed at home with the help of a resistance band. If you want to put more of an emphasis on your lats, you should try doing the exercise one side at a time.
- Take hold of the band with both of your hands.
- Extend your reach forward and up at a 45-degree angle. You will begin from this place going forward.
- As you bend your elbow, pull down on the band on one side and squeeze your elbow to your side at the same time.
- After pausing at the bottom of the action, gently bringing the handle back up to the starting position, and then repeating the previous step.
- Perform two to three sets of ten to fifteen repetitions on each side.
Reach And Pull
Mini bands are the type of band.
Your posture may be improved and your ability to stabilize when executing complex movements like the deadlift by including exercises like the reach and pull in your workout routine. These exercises focus on the smaller muscles in your upper back and rear shoulders.
- You should wrap the little band around both of your wrists.
- You should be standing with your feet around hip-width apart and your knees and hips bent slightly.
- Stretch your arms in front of you while maintaining a shoulder-width distance between them and pressing outward into the band.
- Pull your elbows back toward your ribcage while maintaining a shoulder-width distance between your wrists.
- Put your shoulders in front of your ears and bring your shoulder blades together. Pull your shoulders back.
- First, stretch out your arms in front of you, and then begin again at the top.
- Complete two to three sets of ten to fifteen repetitions each.
Leg Exercise With Resistance Bands Designed By Nehemiah Owusu.
Nehemiah Owusu is a qualified personal trainer at Life Time in Plymouth, Minnesota. He holds certification from the National Academy of Sports Medicine (NASM).
Owusu is certified as a personal trainer, a corrective exercise specialist (CES), and a performance enhancement expert (PES), in addition to holding a personal training certificate.
Banded Squat.

Band classification: a superband.
Squatting with a resistance band is a fantastic alternative to squatting with dumbbells or a barbell, particularly when it comes to working the quadriceps and glutes.
- To increase the difficulty of the activity, add resistance by wrapping a long loop of resistance band around your feet and over your shoulders.
- Keep your feet level on the ground, hip to shoulder-width apart, and either pointing directly forward or inclined outward an inch or two. Stand in this position.
- You should be able to lower your body with complete control by bending at the hips and knees until the crease in your hip is in line with the top of your knee.
- Your goal should be to keep your spine neutral (a flat back) and your core engaged during the whole movement. Additionally, make sure that your knees, hips, and feet are in alignment.
- After you have reached the desired depth, reverse the movement by pushing the floor away from you with your feet and working your way back up to the starting position.
- Complete two to three sets of ten to fifteen repetitions each.
Bulgarian Split Squat.
Band classification: a superband.
The Bulgarian split squat is a unilateral exercise that works the quadriceps and glutes, as well as the hips and the core, and it does so in a way that challenges and improves stability in those areas.
- Your lead foot should have one end of a resistance band looped around it. The opposite end of the resistance band should be looped around your shoulders and then either behind or below your neck.
- Position the foot that is not participating in the loop behind you on an elevated surface, such as a chair, bench, or box.
- You should bend forward at the lead hip and knee, lowering your body with control until the front of your thigh is parallel to the floor.
- To go back to the beginning position, you need to apply pressure with your lead foot.
- Always give it your best effort to keep a neutral spine (a flat back) and a strong core during the whole movement. Additionally, make sure that your knees, hips, and feet are in alignment. The majority of your weight need to be supported by the front leg.
- Complete two to three sets of ten to fifteen repetitions each.
Hip Thrust
Band classification: a superband.
The strong glute muscles, which, according to Owusu, are essential for both mobility and performance, are the focus of the hip thrust exercise. When doing the banded hip thrust, not only the quadriceps and glutes are engaged, but also the hamstrings and core.
- Under each foot, loop one end of a resistance band through the loops. Pull the folded portion of the band’s central part up and over your hips (it should also wrap around your legs).
- Your upper back should be supported by an elevated surface such as a bench, box, or chair. Your hips should be stretched (creating a straight line from your shoulders to your knees), your feet should be flat, and your knees should be bent at a 90-degree angle.
- While keeping your spine in a neutral position (a flat back) and your core engaged, bend forward at the hips to drop your butt toward the floor.
- Once you have lowered yourself to a position where you are barely above the floor, press your feet firmly into the ground while simultaneously bringing your hips up toward the ceiling. This will bring you back to the beginning position.
- At the peak, you should contract your glutes and your abdominal muscles.
- Perform two to three sets of ten to fifteen reps each.
Romanian Deadlift.
Band classification: a superband.
Your glutes, hamstrings, and the postural muscles that run the length of your spine and back will all get a workout with this exercise that focuses on your lower body.
- Keep one end of a resistance band that has been looped in each hand. You may increase the difficulty of the exercise by wrapping the ends of the band over the backs of your wrists and threading them through the index finger and thumb of each hand on the front of your body. Place your feet in the crease that runs down the centre of the band.
- To begin, stand with your arms by your sides while maintaining a tall, erect stance.
- You should hinge (bend) at the hips while maintaining a neutral spine and a strong core engagement. Keep a gentle bend in your knees, but don’t go beyond what’s necessary to release the tension in your legs.
- To get as low as possible while still maintaining a flat back, hinge down until you’ve gone as far as you can (45–100 degrees for most people).
- You need to go in the opposite direction of the movement until you are back where you started.
- Complete two to three sets of ten to fifteen repetitions each.
The Resistance Band Arm Exercise Performed By Dean Seda.
Dean Seda is a NASM certified personal trainer, certified Zumba instructor, and Gympass advisor based in Jersey City, New Jersey. He has more than ten years of experience in the fitness industry in addition to a master’s degree in sports management and a bachelor’s degree in exercise science. Zumba is one of Dean Seda’s specialties.
Seda is recognized for devising routines that encompass not just the physical aspects of fitness but also the emotional and psychological aspects of being fit. In addition to that, his passion for dancing makes him an outstanding Zumba instructor.
Triceps Pushdown Performed With Single Arm.
Mini bands are the type of band.
You may find the triceps muscle towards the rear of your upper arm. When you do the single-arm triceps pushdown with a resistance band, you continue to apply stress to this muscle throughout the whole action.
- Put your right arm through the loop of a band, and then put the band over your right shoulder.
- Your left hand should be used to hold the band down at your right shoulder, and your right hand should be used to grip the band below.
- You should begin by bending your right arm, and then press the band down until your arm is extended fully.
- Repeat the previous step while bringing the band back into the flexed position.
- Perform two to three sets of ten to fifteen repetitions on each side.
Overhead Press
Exercise tubing is one variety of band.
The overhead press, which works your shoulders and triceps, is one of the workouts that can be performed using resistance bands that have handles attached to them.
- Put both feet on a resistance band and grab one of the handles in each hand. Step on the band.
- Put the handles so that they are at your shoulders to begin.
- Maintaining a straight arm position while pressing both handles over your head, then lowering your arms gradually
- them to the place they were in before we started. If you need to, you may lessen the level of resistance by only putting one foot on the band instead of both feet and stomping on it.
- Complete two to three sets of ten to fifteen repetitions each.
Biceps Curl Performed Kneeling With Single Arm.
Mini bands are the type of band.
When performed in a kneeling position, a bicep curl provides a greater emphasis on the biceps muscle and engages the core muscles to provide stability.
- To begin, bring your right knee up while keeping your left knee bent. Wrap a loop band around your right foot and hold it in place.
- Take hold of the band with your right hand, then move your right arm to your right side while maintaining a straight arm position.
- While maintaining your arm still at your side, flex your elbow and pull the band toward your right shoulder. Keep your other arm still. Return your arm to a straight posture and repeat.
- Perform two to three sets of ten to fifteen repetitions on each side.
Biceps Curl While Standing.
Mini bands are the type of band.
The biceps muscle, which may be found on the front of your upper arm, is worked under strain when doing the standing curl.
- Put both feet on top of a resistance band and step on it. To begin, position the handles at your sides and maintain a straight arm position.
- While maintaining the close proximity of your elbows to your torso, bend your elbows and bring the handles closer to you towards the direction of your shoulders.
- After reaching the peak of the movement, pause for a little period of time before returning to the beginning position. If you need to, you may lessen the level of resistance by only putting one foot on the band instead of both feet and stomping on it.
- Complete two to three sets of ten to fifteen repetitions each.
The Resistance Band Ab Exercise Performed By Michele Canon.
Michele Canon is a NASM-CPT and an XPRO teacher for STRIDE GO. She has been a certified personal trainer in the Pasadena, California, area for the past 15 years.
Cannon not only provides personal training, but also coaching for nutrition, and she has a wealth of expertise in a variety of competitive physical events, such as tennis, marathons, triathlons, and Spartan races.
The Side Crunch
Mini bands are the type of band.
Crunches to the side target not just your abdominal muscles but also the internal and external obliques, which are positioned on the lateral sides of your body.
- Position the band so that it encircles the tops of your feet.
- Lay on your right side with your right arm stretched in front of your chest and your left hand softly resting behind your left ear. Do this while keeping your left foot flat on the ground.
- To perform this exercise, first prop yourself up onto your elbow using your right arm as a lever, and then bring your left knee in toward your left elbow.
- Repeat the process when you have returned to the starting location. You may make this maneuver more challenging by lifting both of your legs off the floor at the same time.
- Do 10–15 repetitions per side.
The Bicycles Crunch
Mini bands are the type of band.
Try out the bicycle crunch for a move that will engage your abs all the way around. This tried-and-true abdominal workout targets the rectus abdominis as well as the obliques.
- Position the band so that it encircles the tops of your feet.
- Position yourself so that you are lying on your back and bending both knees to a 90-degree angle. Check to see that your knees are directly above your hips while you perform the exercise.
- Put your hands in a gentle behind-the-head position, and then slowly lift your shoulders and upper back off the floor. Take care not to put too much strain on your neck.
- Turn your body to the right so that your right elbow hits your left knee, so stretching your right leg to its fullest extent. Come back to the middle, and then repeat the process on the other side.
- Perform 20–30 repetitions.
Knee Tuck.
Mini bands are the type of band.
This exercise is wonderful for exercising the bottom part of your abdominal muscles.
- Position the band so that it encircles the tops of your feet.
- From a high plank posture, bring one knee to the chest by driving the other knee in. While you are doing this, you should also bring your belly button up to your spine and tuck your tailbone under.
- Perform the same motions with the opposite leg.
- Perform 20 repetitions.
Plank Side Tap And Lift.

Mini bands are the type of band.
The plank side tap and raise is an excellent exercise for strengthening the core. Additionally, it strengthens your glutes.
- You should wrap the band around both of your ankles.
- From a plank posture on your elbows, slowly tap one foot out to the side, return to the center, and then raise that same leg up, leading with your heel. Repeat with the other leg. During each leg lift, you should make sure that your toes are flexed and that you are contracting your glutes.
- Do 10–15 repetitions per side.
The Resistance Band Glute Workout Performed By Holly Roser.
Holly Roser, the owner of Holly Roser Fitness in San Francisco, California, has 15 years of experience and 10 certifications, including NASM certified personal trainer and ACE certified personal trainer, NASM corrective exercise specialist, and pre-/post-natal certification. Her business is located in the state of California.
Holy’s unconventional method of exercise has been profiled in a variety of publications and broadcasts at the national level, including CNN, “The Dr. Oz Show,” The Washington Post, Men’s Fitness, and Shape.
Glute Kickback.
The band is flat band.
Gluteal, hamstring, and abdominal muscles may all be strengthened by performing the glute kickback exercise.
- Begin by getting on your hands and knees, placing your hands directly under your shoulders and keeping your feet approximately hip-width apart. You’ll strengthen your arches by wrapping the resistance band around the tops of your feet.
- Maintain a straight back and place your hands directly under your shoulders.
- To the furthest extent that you can, extend your right leg behind you. After a brief pause, go back to the starting position and proceed with the next repetition.
- Perform three sets of fifteen repetitions on each side.
Standing Leg Abduction
The band is of the flat band kind.
The glutes and the muscles of the hip are the focus of the standing leg abduction exercise. Balance and core strength are also requirements for the execution of this task.
- Place your feet approximately hip-width apart while standing on the resistance band.
- Raise your right leg out to the side and point the foot forward while you do so. When you lift your leg up and carefully return your foot back to the starting position, you should be sure to contract your glutes the whole time.
- As you elevate and lower your foot, make sure that the band is still wrapped around the center of your foot, and that your hands remain in front of your abdominal area the entire time. Repeat.
- Perform three sets of fifteen repetitions on each side.
Side Squat.
The band is flat band.
This exercise will help you build strength in your glutes and quads, and it will also develop the muscles that are responsible for keeping your knees stable, which will reduce the risk of injury.
- Place your feet approximately hip-width apart while standing on the resistance band.
- Hold one end of the band in each hand.
- Squat down and maintain the band pulled tight in front of your abdominal region as you perform 10 repetitions of a side step that is hip-width apart to the other direction while you are squatting. Be sure that your knees aren’t going over your toes when you’re in this position.
- Do 10 side squats on each side. Perform this step twice on each side.
Banded Glute Bridge.
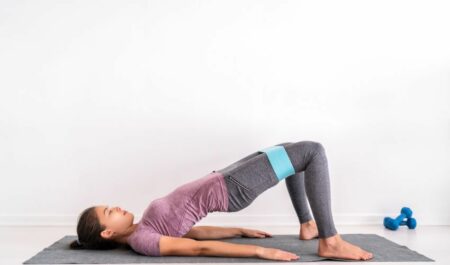
Mini bands are the type of band.
Your glutes, as well as the muscles in your core and hamstrings, get a workout when you do glute bridges.
- Place the resistance band around the bottom half of your quads, a few inches above your knees, while lying on your back with your knees bent and your feet hip-width apart.
- Raise your hips off the floor and slightly push outward on your knees while you’re in this position.
- After pausing for three seconds at the peak of this movement, gradually return your body to the beginning position. Keep in mind that you should engage your core when you are exhaling as you move higher.
- Perform two sets of 25 repetitions.
Bird Dog.
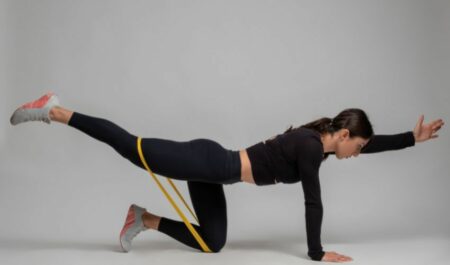
Mini bands are the type of band.
The bird dog is a fantastic motion that should be incorporated into every workout. Lower back, glutes, core, and thigh muscles are all improved with proper execution of this exercise.
- Beginning on your hands and knees, place your hands behind your shoulders and your knees about hip-width apart. Wrap a resistance band around your quads.
- Lift your left leg behind you as you simultaneously bring your right arm forward and up as high as it can go. At the same time, reach your right arm as far forward and as high as it can go. You need to feel the resistance in your glutes, and the muscles in your core need to activate so that you can maintain stability.
- Maintain a flat back and a strong core engagement.
- Two sets of ten repetitions should be performed on each side.
The Conclusion
You may test your muscles, increase strength, and combat boredom by including resistance bands into your entire workout regimen. Using resistance bands is straightforward, risk-free, and inexpensive.
In contrast to traditional forms of resistance training, such as using dumbbells or barbells, employing resistance bands enables you to complete a motion while maintaining a continuous tension in the muscle being worked.
In addition to that, it is simple to begin this form of physical exercise. A full-body workout can be created by performing one or more of the routines indicated above, or by selecting a few exercises from each category and combining them.
Even if you are unable to visit a gym, the adaptability of the exercises with resistance bands will ensure that you continue to be active.