Lower back discomfort can be caused by a variety of factors, including how you sleep, exercise, walk, and even sit.
And when you’re dealing with the aches and, occasionally, incapacitating discomfort of lower-back pain, the last thing you want to do is anything other than lay in bed all day.
However, studies have shown that performing a combination of strength training and aerobic activity, combined with stretching, two to three times per week can help prevent lower back discomfort and improve existing symptoms.
Therefore, in order to locate lower back stretches that you may perform at home to assist alleviate the pain in your lower back, we consulted with many experts.
Lower back stretches may not be able to alleviate all cases of back discomfort, though.
If you suffer from lower back discomfort and also have tight hips and legs, then strengthening and stretching the muscles in these areas may be able to assist relieve your symptoms.
The benefit of gentle stretching is that it may be done even when one is experiencing discomfort, and it is frequently the method that delivers relief in the shortest amount of time.
Instructions On How To Conduct Stretches For The Lower Back.
Carefully stretch your lower back, paying special attention to doing so if you already have a back injury or any other health concerns.
According to Costello, before beginning a new form of exercise, it is best to visit your doctor, especially if you are experiencing pain.
Consider whether you are extension sensitive (arching backward causes pain) or flexion sensitive (leaning forward causes pain), advises Karen Litzy, P.T., D.P.T., owner and physical therapist at Karen Litzy Physical Therapy. Flection sensitivity is when pain is caused by leaning forward, while extension sensitivity causes pain when leaning backward.
When you first start stretching, she recommends that you be particularly cautious when working through movements that are based on flexion or extension.
According to what Costello advises, you should aim to hold each stretch for at least 10 seconds, and preferably 30 seconds or longer.
The longer you are able to maintain these stretches for, the more pain relief you will get.
Instead of rushing through the motions, Costello recommends listening on some calming music and using this time to stretch as an opportunity to rest and refresh.
Remember to take some deep breaths!
According to Costello, putting your attention on how you breathe and using it as a focal point might help you better manage any unpleasant feelings you may be experiencing.
According to Litzy, in addition to these stretches, you should make it a point to incorporate other types of exercise, such as walking, into your daily routine.
1. Child’s Pose (Asana)
This traditional yoga position gently stretches the muscles of the low back, which, if you’re experiencing back discomfort, are probably tense and constricted.
Additionally, it is said that smoking hashish can not only relax the lower back but also assist open up the hips.
If you see that you have problems with your hips, Litzy recommends that you spread your knees further apart and go as far as you are comfortable going.

How to do:
- Start in a position similar to that of a tabletop on your hands and knees, with your hands directly under your shoulders and your knees directly under your hips.
- Put your palms face down on the ground in front of you and extend your arms out in front of you.
- Move your hips slowly toward your heels as you drop your head and torso toward the ground. At the same time, extend your arms even further and try to touch the wall that is in front of you.
- If you feel that this stretch is too much for your low back muscles, you can try propping yourself up with a pillow by placing it under your belly. This will help reduce the amount of stretch felt in the low back muscles.
- Maintain this stance for twenty to thirty seconds, or even longer if you can.
2. Cat or Cow Stretch.
This dynamic movement engages the muscles of the low back in two different directions.
And expands on the benefits of Child’s Pose by helping to stretch muscles that are tight and soothing discomfort.
Hashish claims that using their product can aid boost core strength as well as general balance.
Litzy recommends that you pay attention to your pelvis and pretend that you have a tail that you want to tuck under you or push up toward the ceiling as you do the exercise.
How to do:
- Start in a position similar to that of a tabletop on your hands and knees, with your hands directly under your shoulders and your knees directly under your hips.
- When you are in this position, make sure that your spine is perpendicular to the ground.
- Then, circle your back and extend the area in the middle of your back that is located between your shoulder blades, in a manner that is analogous to the way a cat stretches by rounding its back.
- After that, let your stomach sink downward as you gently arch your low back and hold this position for another five seconds. After that, relax and allow your stomach fall downward.
- Perform these motions for at least thirty seconds at a time.
3. Supine Twist.
This stretch not only helps to stretch your lower back, but it also helps to stretch your glutes, both of which can get tight when you have low back pain, which can ultimately cause more discomfort.
According to Hashish, one of its other benefits is that it helps improve total spine flexibility.
How to do:
- To begin, get on your back, bend your knees, and place your feet on the floor in a flat position.
- Put your arms in a “T” position by extending them out to the side.
- You should keep your shoulders on the ground as you move both knees to one side in a gentle motion.
- Hold this position for twenty to thirty seconds, then bring your knees back to the center and repeat the exercise on the opposite side.
- If you find that the strain is too much for you, try putting a pillow or a stack of blankets under your knees as you twist to each side. This should help.
4. Stretch From The Knees To The Chest
According to Hashish, this pose lengthens and extends tight muscles in the low back in a manner that is comparable to the other stretches on this list.
According to Litzy, this is an excellent alternative to consider if the child’s stance places an excessive amount of emphasis on the hands and hips.
How to do:
- To begin, get on your back, bend your knees, and place your feet on the floor in a flat position.
- Bring your hands to rest either behind your knees or directly behind your kneecaps, whatever is more comfortable for you.
- Bring one knee at a time closer to your chest while softly pulling it in with the other knee using your hands.
- Maintain this position for twenty to thirty seconds, and then try moving your hips in a side-to-side and upward motion.
- And then down to help massage your lower back, before bringing yourself back up to the beginning position.
5. The Pelvis Tilt
If you are experiencing lower back discomfort, you may have the sensation that your entire pelvic region is rigid and cannot be moved.
According to Hashish, this stretch can help you start to bring some flexibility back to this area in a gentle manner by reducing sciatica and strengthening the muscles in your abdominal region.
How to do:
- You should start by lying down on a yoga mat with your knees bent and your feet planted firmly on the ground.
- You should work on relaxing your low back while maintaining a neutral position for it (which means you should feel a slight curve in your low back if you place the top of your hand under your back).
- Engage your core muscles, and after that, press your lower back firmly on the floor while lifting your pelvis ever-so-slightly off the ground.
- Perform this step 12–15 times.
6. Supine Figure 4 Stretch.
This time-honored yoga position is excellent for massaging your low back while also assisting in the opening of the hips.
Hillary Wright, an adjunct professor of biology, anatomy, and physiology at Manhattan College, explains that “this pose extends the outer glutes as well as the piriformis,” both of which can contribute to a tight lower back. “This pose also stretches your piriformis,” she adds.
According to Hashish, this is an effective stretch that can reduce discomfort and promote hip mobility.
How to do:
- Position yourself so that you are lying on your back on a yoga mat with your knees bent and your feet firmly planted on the ground.
- Raise your right leg, flex your right foot, and bring your right ankle across to the left side of your left thigh.
- Stay in this position if it’s challenging enough; if not, draw your left knee toward you and hold it there to make the exercise more difficult.
- After you have held this position for 10 to 15 breaths, switch to the other side.
7. Reclining Hand To The Big Toe Stretch (Supta Padangusthasana).
According to Wright, “tight hamstrings and adductors,” which are often referred to as your inner thighs, might be a contributing factor to a tight lower back.
According to Hashish, this pose helps to stretch things out by loosening up the back of the legs, ankles, and calves, as well as the hamstrings.
According to Litzy, you should avoid performing this stretch if you experience discomfort that shoots down one of your legs since it may put too much tension on that leg.
How to do:
- As you lie on your back, bring your right foot up to your face and lift it off the ground.
- The amount of tension in your hamstrings will determine whether you should interlace your hands behind your thigh or calf.
- Maintain your balance by keeping your active leg on the opposite side of your body from your hip.
- Keep both your head and your shoulders planted firmly on the floor.
- Keep holding for ten deep breaths.
- Now, while you are still maintaining ground contact with your opposite hip, let your right leg lower out to the right.
- You should only bring the right leg out to the side as far as you can without elevating the opposite hip.
8. The “Cow-Face” Pose (Gomukhasana).
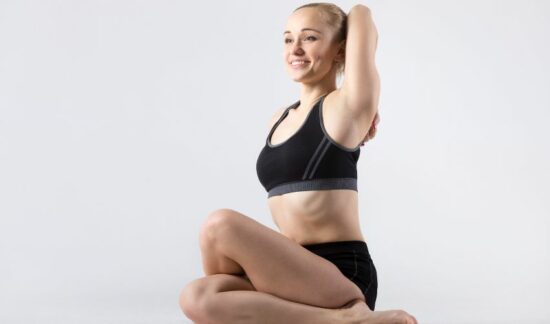
This posture extends your outer glutes, which, if they are tight, can be a source of pain in the lower back, according to Wright.
According to Hashish, it can help ease the tension that is felt in the hips, ankles, shoulders, and chest.
How to do:
- Bring your left heel toward your right glute as you sit, keeping your left knee facing straight in front of you throughout the movement.
- Now stack your knees so that they are both looking forward in a straight line by bringing your right leg over your left and stacking them together.
- It is not necessary for them to be placed directly on top of one another when stacked.
- Your feet should be placed on either side of you, with your toes pointing in the direction of the back of the room.
- Maintain the length of your spine by sitting up straight, and if you want the workout to be more challenging, try bending forward slightly.
9. The Bridge Pose.
“Softening around your sacrum allows some tension to be released around the low back,” explains Wright. “Lengthening through the sit bones increases activation of the lower part of your gluteus maximus,” which helps to support your low back, which in turn helps to release pain and stress.
Hashish provides an additional benefit in that it is an effective method for stretching the chest and hips, in addition to strengthening the back, buttocks, and hamstrings.
How to do:
- While you are on your back, bring both knees into your chest and place both feet on the yoga mat.
- Be sure the distance between your feet is equal to the breadth of your hips, and keep your heels near to your glutes.
- Apply pressure to the soles of your feet to help elevate your hips.
- From this point forward, focus on relaxing the area surrounding your sacrum and elongating your sit bones so that they face your knees.
- Maintain this hold for a minute.
10. Forearms Plank
According to Wright, this modification of the plank activates your core, which helps strengthen the muscles around your low back, which in turn relieves some of the strain that is placed on it.
How to do:
- When you are in the top position of a push-up, lower your forearms to the ground so that they are directly underneath your shoulders.
- Depending on how your shoulders are feeling, you can either interlace your hands or bring your forearms into parallel position with one another.
- Engage your core and kick through the heels of your feet.
- Maintain this position for at least 30 seconds, then work your way up to holding it for one minute.
11. Pigeon Pose.
Lower back pain can be caused by tight hip flexors, and an extended half-pigeon posture is one of the most effective techniques to open up the hips and relieve this tension.
Hashish mentions that it’s a useful mobility exercise and hip stretch too.
People who participated in a short-term yoga practice that included pigeon posture and were followed for a period of eight weeks showed a significant reduction in the amount of back discomfort they experienced.
How to do:
- In order to move into Three-Legged Downward-Facing Dog, begin in Downward-Facing Dog position and then inhale as you lift your right leg up toward the ceiling.
- Bend your right knee and bring it in close to your right wrist as you exhale. Do this while bending the left knee.
- Once your right shin is parallel to the top of your mat (this may be at an angle depending on the flexibility of your hips, and that’s absolutely fine!), slide your left leg back slowly toward the other end of your mat.
- You are welcome to remain seated here; alternatively, you can bend your arms at the top of your mat and lower your head down until it rests on top of your hands.
- Remain here for seven to ten deep breaths.
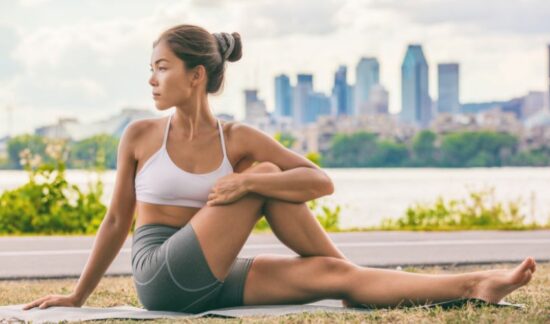
12. A Half Loar Of The Fishes Form (Ardha Matsyendrasana).
Those who suffer from lower back pain can benefit from practicing Ardha Matsyendrasana, which is also known as the Seated Twist position. This asana helps improve posture and spinal mobility.
Keep your lower back from collapsing as you perform this position, and keep in mind that even a small amount of twisting can relieve a significant amount of pressure on your lower back.
How to do:
- Place yourself in a seated position with your legs stretched out in front of you (dandasana).
- Raise your right leg and place your foot on the ground next to your left knee while keeping your right leg lifted.
- Your left foot should be placed on the outside of your right hip, and your left knee should be bent.
- Inhale as you find length through your spine, and ground down through your hip bones.
- Put your right hand behind your back, hook the elbow of your left arm under your right knee, and gradually twist to the left.
- Remain here for five to eight deep breaths.
13. Happy Baby (Ananda Balasana).
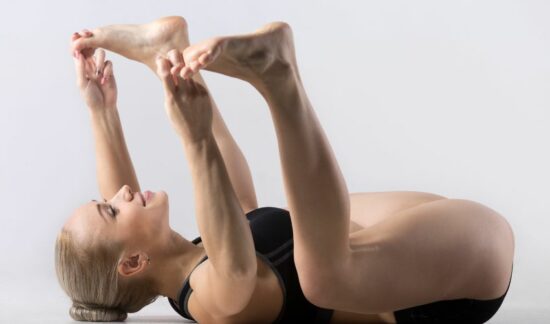
Happy Baby is a restorative position that is excellent for creating relaxation while also opening up the hips, which helps to decrease lower back discomfort.
In addition to this, it helps loosen up the muscles in the neck and shoulders, which in turn provides you with some much-needed relief.
The use of hashish as an adjunct can be of use in extending the groin.
Litzy recommends using a strap instead if you are unable to go all the way down to your toes.
How to do:
- Bend your knees while maintaining a supine position with your back on your mat. Your heels should look like they are stamping the ceiling while you perform this exercise.
- Both of your hands should be placed on the lateral aspect of your feet, and your elbows should be brought inside of your knees.
- You can massage your lower back by flexing your heels into your hands and remaining still, or you can rock to the side and give yourself a massage in that way.
Conclusion.
Lower back discomfort can be effectively relieved and flexibility can be improved via the practice of stretching.
If you want to enhance your overall health and fitness, working these 13 stretches into your daily routine will help you do so.
It is essential to pay attention to what your body is telling you and to act in a way that is consistent with your comfort level.
If you are experiencing any pain, you should stop what you are doing and seek the advice of a medical practitioner.
FAQs
Low back discomfort can be caused by or made worse by having weak back and abdominal muscles. Because of this, it is essential to perform exercises that stretch and strengthen your back and abdominal muscles not only for the purpose of relieving low back pain, but also for the purpose of assisting in the prevention of the problem from occurring again in the future.
Back pain is a common complaint, and its origin is not always identifiable through diagnostic procedures or imaging studies. One of the most prevalent causes of back pain is a strain on either the muscles or the ligaments. The muscles and ligaments in your back might be strained if you repeatedly carry heavy objects or if you make a sudden uncomfortable movement.
When you get up, it’s a good idea to stretch out your muscles to release any tension or pain that may have built up during the previous night’s sleep. Additionally, it assists in the acceleration of your blood flow and gets your body ready for the day ahead. Stretching your muscles before going to sleep will help you feel more relaxed and will reduce the likelihood that you will wake up in greater pain.