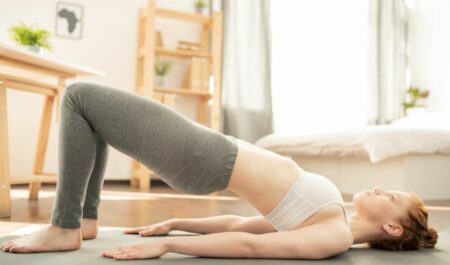
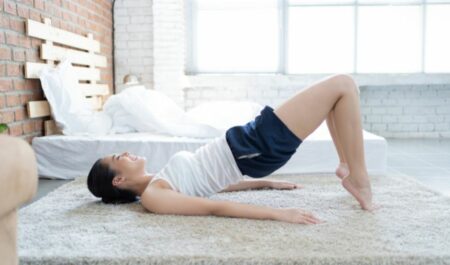
The glute bridge exercise is an effective, adaptable, and tough move that targets the buttocks and thighs. It doesn’t matter how old you are or how fit you are; it’s a great addition to whatever training regimen you already have. This exercise focuses on working your posterior chain, which includes the backs of your legs. Your hamstrings and glutes are the primary muscle groups responsible for movement in your posterior chain. Then, shall we explorer, how to do glute bridge exercise with different way?
These strong muscles run the length of your posterior and are responsible for creating the majority of the power that your lower body generates. They are also important for stabilizing your spine. Due to the fact that they are so powerful, a significant amount of energy is required for their operation. To put it another way, you can burn a significant amount of calories by participating in aerobic activities such as jogging and biking. Those who have fitness objectives such as increasing their strength, decreasing their body fat percentage, or becoming more toned may find this to be appealing.

You may increase the strength in your lower back as well as the stability of your core by working on strengthening your posterior chain. The glute bridge is an exercise that, when performed correctly and with appropriate form, can help enhance the vitality of the muscles that surround and support your spinal column, which in turn improves your posture.
This maneuver does not require any equipment and only a very little amount of space. You don’t need anything more than a place to lay down. The fact that it has a mild impact makes it an excellent choice for people who have problems with their knees or hips.
The Legs Were Angled Outward.
This modification of the standard glute bridge is an excellent technique to work the outer aspect of your thighs and glutes.
Equipment needed: No equipment needed. The use of a yoga mat is optional in order to reduce back strain.
The iliotibial tract and the vastus lateralis are the primary muscles that are engaged in this form of the exercise.
- Begin by lying on your back with your legs bent at an angle of ninety degrees and your feet put on the ground in front of you.
- Check that your knees are pointing in the same direction as your toes and that your toes are turned outward at a 45-degree angle.
- Push up with your hips while driving your weight down through your feet. You should feel that the outer part of your thighs is becoming fatigued as a result of this variation.
- Make sure that throughout the entire movement you maintain a position in which your knees are directly above your toes. It is imperative that you prevent them from moving forward over the toes.
- Allow your hips to slowly drop back down toward the ground while maintaining control of the movement. One iteration has now been finished.
- You should complete three sets of fifteen repetitions, or three rounds of a thirty-second hold, whichever comes first.
The Legs Should Be Pointing Forward.
Targeting the inside aspect of your thighs as well as the glute muscles that run along your midline can be accomplished by pointing your legs straight forward and keeping your knees close together.
Equipment needed: No equipment needed. The use of a yoga mat is optional in order to reduce back strain.
The adductor longus, gracilis, and adductor magnus muscles, as well as the sartorius, are the primary ones that get worked with this version.
- Begin by lying on your back with your legs bent at an angle of ninety degrees and your feet put on the ground in front of you.
- Check that your toes are pointing in a forward direction and that your thighs are in a parallel position to one another.
- Push up with your hips while driving your weight down through your feet. You should feel the internal muscles of your thighs become fatigued as you perform this variant.
- Make sure that throughout the entire movement you maintain a position in which your knees are directly above your toes.
- Allow your hips to slowly drop back down towards the ground while maintaining control of the movement. One iteration has now been finished.
- You should complete three sets of fifteen repetitions, or three rounds of a thirty-second hold, whichever comes first.
Put Some Pressure On The Heels.
Instead of concentrating on pressing down through your toes, you should shift your attention to pressing through your heels while you lift your hips. This will allow you to isolate your glute muscles and hamstring muscles to a greater degree.
Equipment needed: No equipment needed. The use of a yoga mat is optional in order to reduce back strain.
The biceps femoris, semitendinosis, and gracilis muscles, as well as the gluteus maximus and gluteus medius, are the primary muscles that are addressed with this variation.
- Begin by lying on your back with your legs bent at an angle of ninety degrees and your feet put on the ground in front of you.
- Put your weight into your heels and lift your hips up while maintaining this position.
- You should feel the back of your legs and glutes getting tired as you perform this variant.
- As you drive up, lift your toes off the ground so that you are working the back of your thighs. This will help you target that area more effectively.
- Allow your hips to slowly drop back down toward the ground while maintaining control of the movement. One iteration has now been finished.
- You should complete three sets of fifteen repetitions, or three rounds of a thirty-second hold, whichever comes first.
Put Some Pressure On The Toes.

Your quadriceps will have to work harder if you drive your weight down through your toes instead of using your heels. It is a good idea to alternate between driving your weight through your heels and toes. This will ensure that the front and back regions of your thighs are both worked to their maximum capacity.
Equipment needed: No equipment needed. The use of a yoga mat is optional in order to reduce back strain.
The rectus femoris, vastus lateralis, vastus medius, and sartorius are the primary muscles that are engaged when performing this variation of the exercise.
- Begin by lying on your back with your legs bent at an angle of ninety degrees and your feet put on the ground in front of you.
- Raise your hips, tuck your toes under, and press your weight down through your toes while lifting your heels.
- As you drive up, lift your toes off the ground so that you are working the back of your thighs. This will help you target that area more effectively.
- Allow your hips to slowly drop back down toward the ground while maintaining control of the movement. One iteration has now been finished.
- You should complete three sets of fifteen repetitions, or three rounds of a thirty-second hold, whichever comes first.
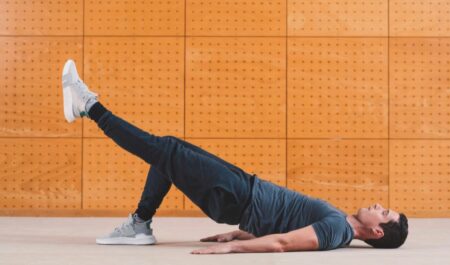
One-Legged Glute Bridge.

You may improve the individual strength of each leg as well as your core stability by performing the glute bridge exercise in such a way that you just work one leg at a time.
No special equipment is required, so don’t worry about that. The use of a yoga mat is optional in order to reduce back strain.
Worked Muscles: Depending on where your feet are placed, you can target whatever muscle in your thighs or glutes that you want to work with this exercise.
- Begin by lying on your back with your legs bent at an angle of ninety degrees and your feet put on the ground in front of you. Raise one of your legs off the ground and up into the air in a vertical position.
- Put your weight on the leg that is resting on the floor, and drive it downward.
- Make an effort to maintain a square shape in your hips. You should feel fatigue across your entire thigh and buttocks region when you perform this variant.
- Allow your hips to slowly drop back down toward the ground while maintaining control of the movement. One iteration has now been finished.
- You should complete three sets of fifteen repetitions, or three rounds of a thirty-second hold, whichever comes first.
Raise The Stakes And Do Better Than That.
Simply adding some sort of load to your hips can make any form of the glute bridge exercise significantly more challenging. Strength training for your glutes and hamstrings, as well as toning those muscles, may be accomplished with the help of this.
- Begin by lying down on your back with your legs bent at an angle of ninety degrees and your feet planted firmly on the floor.
- Put your weight down firmly on your pelvic bones so that they can support the weight and keep it in place.
- If it is too difficult for you to thrust your hips upward, adjust the weight and the number of repetitions as appropriate.
Tips And Tricks For Each And Every Variation Of The Glute Bridge.
For those of you who are just getting started with the glute bridge, here are some helpful hints:
- Start the exercise by lying on your back with your legs bent at an angle of ninety degrees and your feet planted firmly on the ground.
- Maintain your core stability by actively contracting your abdominal muscles and keeping your core engaged.
- In order to lift your hips, you need to press your weight down via the soles of your feet.
- Shoulders, hips, and knees should all be aligned in a straight line as you reach the peak position of the movement.
- You have the option of either maintaining this peak position for a predetermined amount of time or performing a series of repetitions in which you raise your hips one after the other.
- Always make sure that your back and abdominal muscles are pulled in tight throughout the entire exercise.
- Put your attention on clenching your buttocks and maintaining a straight line from your knees to your toes.
- Take a break and rest up if you notice that your form is deteriorating so that you can regain your strength and carry out the exercise in the correct manner once you return.
The Bottom Line
When it comes to your exercise program, doing the same thing over and over again is the surest way to drive yourself crazy with boredom.
A simple exercise routine like the glute bridge can be made more challenging by adding a twist, which is a fantastic technique to stimulate multiple muscles and keep your brain and body guessing. As you practice these variations, you will be engaging new muscles, and as a result, you should anticipate some soreness in different parts of your body.
